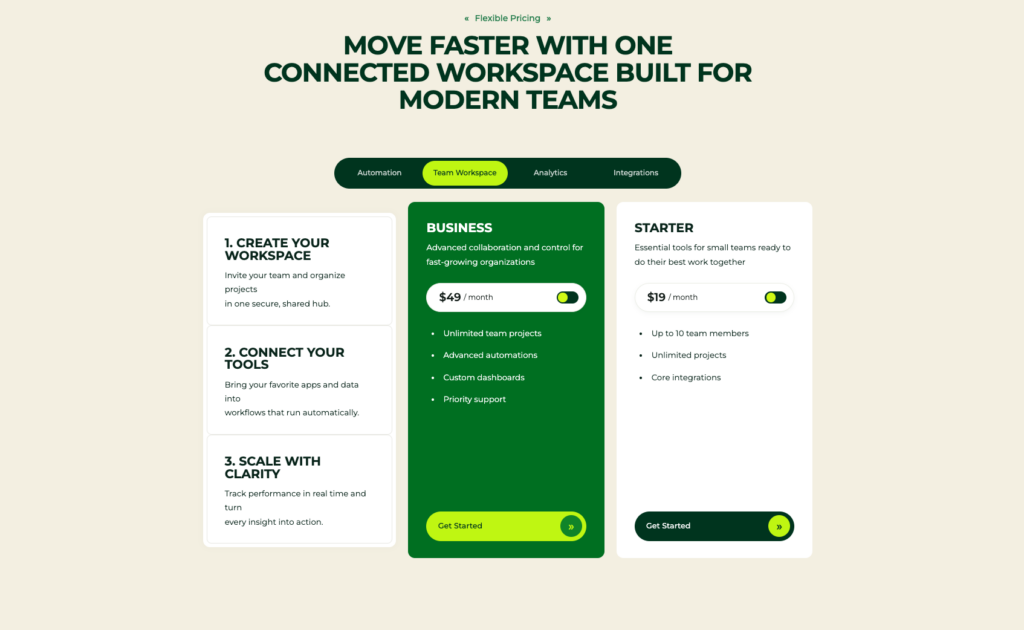
This free SaaS pricing table template gives you a ready-made pricing section with product tabs, monthly and yearly billing, responsive pricing cards, and a JavaScript event you can connect to your own signup or checkout flow.
You get both a standalone HTML version and a WordPress version built from PHP, CSS, and JavaScript.
The WordPress setup below is intended for classic or hybrid themes where you can edit PHP template files. Classic themes use PHP templates, while block themes use HTML block templates, so the same get_template_part() workflow does not drop directly into the Site Editor.
What the template includes
The section combines four pieces:
- Product tabs for switching between different SaaS offers
- Two pricing plans for each product
- A monthly and yearly billing toggle
- A short three-step onboarding column beside the plans
The example tabs are Automation, Team Workspace, Analytics, and Integrations, but those labels and their pricing data can be changed in the JavaScript.
The package includes:
- A standalone HTML demo
template-parts/membership-plan.phpmembership-plan.cssmembership-plan.js
You can use the HTML version independently or add the PHP version to a WordPress theme.
Product tabs without duplicating the pricing layout
Instead of creating a separate pricing table for every product, the template uses one set of cards and updates their content when the visitor changes tabs.
Each product can have its own:
- Plan names
- Descriptions
- Monthly prices
- Feature lists
This is useful when several products share the same pricing-page structure.
The tabs are also designed for keyboard navigation. A proper tab interface should support keyboard movement between tabs and expose the selected state through the appropriate accessibility semantics. The WAI-ARIA Tabs Pattern, for example, defines Left and Right Arrow behavior for horizontal tab lists.
Before publishing the component, I would still test the finished implementation with a keyboard rather than treating ARIA attributes alone as proof that a component is accessible.
Monthly and yearly pricing
The billing control switches the cards between monthly and yearly prices.
In the example data, the yearly price is calculated as 10 times the monthly price. That is only a demo pricing rule. Change it in the JavaScript if your annual pricing uses a different discount or a manually defined annual price.
The visible billing label updates with the selected cycle so the reader can see whether the displayed amount is per month or per year.
Responsive layout
The desktop design places the onboarding steps beside the two pricing cards.
At narrower widths, the layout reflows so the cards have enough room rather than forcing the desktop grid onto a phone.
Responsive behavior is especially important for a pricing component because plan names, feature lists, prices, and CTA buttons all need to remain readable and easy to use at smaller widths.
I would test the actual section on a phone after changing its copy. Longer plan names or feature text can affect the layout even when the original demo looks fine.
Connect the selected plan to another flow
The template’s JavaScript dispatches a custom browser event when someone chooses a plan:
membership-plan:selected
The event includes the selected product, plan, and billing cycle, so another script can react without requiring you to rewrite the pricing component.
For example:
document.addEventListener('membership-plan:selected', (event) => {
  console.log(
    event.detail.program,
    event.detail.plan,
    event.detail.billing
  );
});
You could use the same event to open a form, update hidden checkout fields, redirect to a signup flow, or connect the selection to your own application logic.
That separation is intentional: the pricing component handles the selection, while your site decides what happens next.
Before adding it to WordPress
If you use a classic or hybrid theme, I recommend placing the files in a child theme rather than editing the parent theme directly.
A child theme lets you modify an existing theme without directly changing its files, so parent-theme updates do not simply replace your custom templates and code.
You should also be comfortable editing theme files. This is not a no-code template.
The installation itself is short, but it involves:
- Adding files to the theme
- Editing
functions.php - Calling a PHP template part
- Editing JavaScript data when you change the plans
If you are using a full block theme, the PHP method below is not the right integration path. Block themes use HTML block templates rather than the PHP template structure used by classic themes.
Step 1: Add the template files
Copy the three WordPress files into your child theme:
template-parts/membership-plan.php
membership-plan.css
membership-plan.js
Your theme might then look like this:
your-child-theme/
├── functions.php
├── membership-plan.css
├── membership-plan.js
└── template-parts/
    └── membership-plan.php
WordPress’s get_template_part() function is designed for loading reusable PHP template parts like this in classic themes.
Step 2: Load the CSS and JavaScript only where you need them
Do not make every page on your site load pricing-table CSS and JavaScript if the component only appears on your pricing page.
For example, if your pricing page uses the slug pricing, add this to your child theme’s functions.php:
add_action( 'wp_enqueue_scripts', function () {

    if ( ! is_page( 'pricing' ) ) {
        return;
    }

    wp_enqueue_style(
        'mp-fonts',
        'https://fonts.googleapis.com/css2?family=Montserrat:wght@400;500;600;700;800&display=swap',
        array(),
        null
    );

    wp_enqueue_style(
        'membership-plan',
        get_theme_file_uri( 'membership-plan.css' ),
        array( 'mp-fonts' ),
        '1.0.0'
    );

    wp_enqueue_script(
        'membership-plan',
        get_theme_file_uri( 'membership-plan.js' ),
        array(),
        '1.0.0',
        true
    );
});
WordPress provides wp_enqueue_script() and the corresponding stylesheet functions so themes can register and load front-end assets through its normal dependency system.
Replace:
is_page( 'pricing' )
with the page where you actually use the section.
If you place the pricing table on several pages, update the condition accordingly.
Do you need the Google Font?
The demo uses Montserrat, but the extra Google Fonts request is optional.
If your theme already uses a font you like, you can remove the mp-fonts enqueue and update the component CSS to inherit your site’s typography.
I would avoid loading a second font family just to make the demo look exactly like the preview.
Step 3: Add the pricing section to the page template
In the PHP template where you want the pricing table to appear, add:
<?php get_template_part( 'template-parts/membership-plan' ); ?>
WordPress will load the template part from the theme. Child themes can also override matching parent-theme template files, which is one reason they are useful for this type of customization.
Refresh the page and check that the pricing section appears.
If nothing renders, confirm:
- The PHP file is in
template-parts/ - The template-part path is correct
- You edited the template WordPress is actually using
- The CSS and JS requests appear on that page
Change the plans and prices
The example product and pricing data lives in the JavaScript object named:
mpPrograms
Each program contains the information used by its pricing cards, including the plan name, description, monthly price, and features.
Edit that data instead of duplicating the markup for every product.
When you change prices, also check the yearly calculation. If your annual plan is not simply monthly price × 10, update that logic before publishing.
This is one of the first things I would change. A pricing template should never go live with placeholder prices or a discount rule that does not match the actual offer.
Change the colors
The stylesheet uses CSS custom properties for the component’s main colors.
That means you can adjust the palette from one place instead of searching through every selector.
If your version includes variables such as:
--mp-forest
--mp-lime
replace their values with your own brand colors.
After changing them, check contrast for:
- Normal text
- Price text
- CTA buttons
- Selected tabs
- Keyboard focus states
Do not assume a brand color that looks good in a mockup will automatically remain readable in every state.
Change the CTA destination
The default CTA points to:
#contact
If the included PHP template exposes the mp_contact_url filter, you can redirect it to your contact page without editing the template markup:
add_filter( 'mp_contact_url', function () {
    return home_url( '/contact/' );
});
For a real SaaS product, you may instead send different plans to different checkout or signup URLs.
If the destination depends on the selected program, plan, or billing cycle, the membership-plan:selected event is the better integration point.
What I would check before publishing
Once you have customized the component, test the finished version rather than assuming the demo behavior survived every edit.
Check that:
- Every product tab shows the correct data
- Keyboard users can operate the tabs
- Monthly and yearly prices are correct
- The billing label matches the price shown
- CTA buttons go to the intended destination
- The layout still works with your real copy on mobile
- Pricing assets are not loading on unrelated pages
- Focus states remain visible
- Reduced-motion behavior still works if your version includes it
- The selection event contains the values your checkout or form expects
The template gives you the pricing component and its interaction model. Your job is to replace the example data and connect the final selection to the real action on your site.